

Webnode (webnode.com) allows you to make great, professional looking websites with minimal effort. You can choose from free and paid subscriptions. A wide list of gadgets and widgets and customization capabilities allows you to experiment to your heart's content.
Since the true measure of the capability of a website lies in the traffic it generates, you will need to install a TraceMyIP tracker to know what is happening to your webnode.com website and how much traffic it generates. This tutorial will explain the mechanics.
Generating a visitor hit counter
If you already have an TraceMyIP account, login into that and select "Add New Project", else follow this link to learn how to register an account and then add the new project. Use the URL of your Webnode.com webpage to generate the tracker code on TraceMyIp.
In the "Code Type" drop down list select Universal Tracker - HTML compatibility Mode 1 and generate the code.
Copy the HTML code to the clipboard.
Installing the visitor hit counter code for webnode.com
Now switch back to your webnode account. Select “Edit Your Website” .
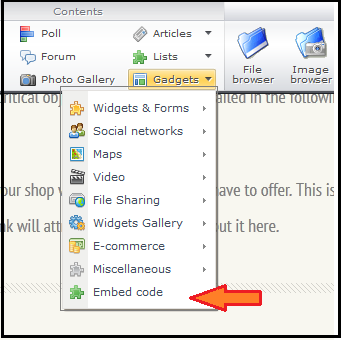
On the edit page, select "Gadgets".

Clicking Gadgets will give you a menu, from this menu select "Embed Code"
Selecting Embed code will give you a text box. Paste the HTML code generated by TraceMyIP and save.
You may get a warning that the code is disabled due to security reasons, Webnode allows you to overrule the warning.

Publish the page and you will be able to see the tracker installed and working.
Verifying the visitor geo tracker code installation
Once you have followed the steps above to install your hit counter code, you need to ensure that the tracker code is installed properly.
- Visit the section(s) of your website and verify that the tracker image shows up as intended. If you are a premium subscriber, disable the invisible tracking option first, then visually verify your tracker installation.
- Additionally, you can check if your own visits are being properly logged. If you are blocking your own visits from being logged by the tracker, disable the auto IP blocking feature first.